Lab Overview (abridged version)
This document is not intended as a replacement for the full Lab Manual and protocols. Rather, it is an overview of the lab components in lay terms to facilitate understanding the Big Picture and the “Why” of the laboratory procedures. There are several overarching goals of the lab project. From an educational point of view, we want you to become familiar with laboratory techniques, workflow, experimental design, interpretation of results, data analysis and representation and troubleshooting. You will have a sense of what it is like to work with DNA, proteins and cells, covering a bit of the fields of molecular biology, cell biology and biochemistry. All of the techniques that we’ll use are widely used by academic researchers and scientists in the biotech/pharmaceutical industries to develop and test drugs.
From a scientific point of view, your major goals are to study a gene of interest (abbreviated GOI: there will be several to choose from), and determine if it has a specific function related to cell growth or death in the mammalian cell lines we’ll be working with. Along the way, you will perform experiments, some of which simply serve as “controls” to test our DNA and ensure that it has the expected characteristics, and other controls that will tell you if everything in the experimental system is working as expected. Without these controls, results can be challenging to interpret!
The flow chart of the project is below. Don’t worry if it has unfamiliar words on it, you will become familiar with the terms and speak the language in no time!

Flow chart of the lab project
Lab groups are typically 3-person teams, with an occasional 2 or 4 person team if the student numbers don’t work out evenly. With your teammates you will conduct weekly lab protocols, keep a lab notebook (to be checked off several times during the semester by the TAs. Please write in your notebook weekly/as you perform the techniques so you don’t fall behind, and include answers to the questions in this document), write 2 lab reports (midterm and final reports) and lead a media discussion during class (counts as 2 HW grades; see Assignments).
You want to choose lab mates who are fun in the lab, but also dependable when it’s time to write the lab reports, etc. We will meet for a total of 13 laboratory periods which will be utilized as follows: 2 weeks of introductory laboratory techniques, 2 weeks for meetings with instructors to discuss results, 1 week (final lab period) will be dedicated to a poster session and the remaining 8 weeks you will be working on a project. Additionally, one or two class periods may be utilized for lab periods. The 8 week project will involve putting DNA into cultured human cells to see if it causes any change in the function of the cells.
Getting comfortable in the lab
During the first two weeks in lab, you will be performing several techniques to familiarize yourself with some basic laboratory procedures. One key skill to be developed during this time is liquid measurement, particularly of very small (microliter) volumes. You will learn how to use a micropipette to measure liquid volumes between 1-1000 µl (1 ml) and plastic (“serological”) pipets to measure volumes between 1-25 mls. You will also learn how to make a buffer solution, which involves calculating molarity of a solution, weighing out chemicals on a balance and adjusting the pH. You will also prepare two items that will be used in later lab periods: you will make a solution of TE buffer that you will use to dissolve your DNA in a few weeks and prepare agar plates with antibiotic for our bacteria to grow on. Finally, you will become familiar with the spectrophotometer, which measures absorbance and is useful for determining the concentration of proteins or DNA.
Detailed procedures can be found here.
Project Week 1: Transformation
This week we begin our lab project.

After obtaining your GFP-tagged gene of choice, the first protocol is the Transformation (you will encounter way too many words that begin with the prefix “trans” in this class.)
You will select the GOI that your group will work with for the entire semester. This will be a fairly arbitrary selection decision, as you are unlikely to know much about these specific genes ahead of time; however, motivated students may read the spec sheet or do some research on their own ahead of time and make a more informed choice. We will need lots of this gene to carry out all of our experiments this semester, so the first step is to make copies of the GOI for later use. We use bacteria to help us with this, and we use a DNA plasmid to act as a vector, or “shuttle vehicle”, to carry our GOI. We just need to get our GOI into the bacteria, and they do the work of making copies. Unfortunately, the process of getting the gene into the bacteria has a low efficiency, so we use antibiotics to kill off all of the bacteria that didn’t take up the gene.
We may ask your group to come in the day before the next laboratory period (Monday) to pick two of the bacterial colonies off of the plate and put each into a large flask of media to grow up larger quantities before the next lab (the amplification step). Because the antibiotic resistance protein is released from the bacteria that produce it, we first put the transformed bacteria on a solid matrix so bacteria without the plasmid don’t have access to the antibiotic resistance protein.
Detailed protocol for Transformation is found here.
Questions:
- What GOI will your group be working with?
- What is the usual function of this gene?
- What does it mean if bacteria grow on your negative control plate?
- What does it mean if bacteria do not grow on your positive control plate?
Week 2: Purifying DNA from the bacteria
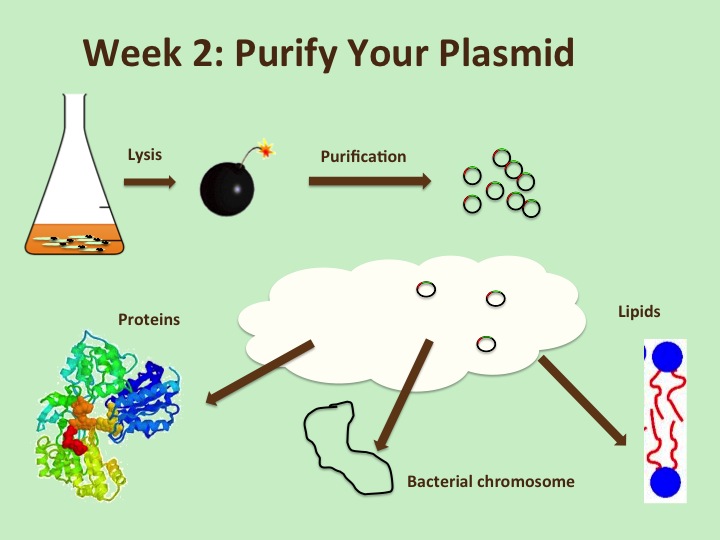
Bacteria are living cellular organisms, so it’s not trivial to isolate your plasmid DNA with your GOI from the bacteria’s own cell stuff. To do this, we use one of many commercial kits that are available. This week you will blow up (lyse) the bacteria cells, precipitate out the large bacteria stuff (proteins, membrane, bacterial chromosome) and then pass the remaining liquid over a column packed with charged silica beads that will bind to the plasmid DNA while everything else runs through it. Then you disrupt this interaction between your plasmid and beads with a high salt solution, and collect the liquid that contains your plasmid. Since this is a dilute sample of DNA in a solution that is not useful for our later experiments, we will precipitate out the DNA and re-dissolve it in a small amount of the TE buffer that we made the first weeks of lab.
Detailed Procedure for Plasmid Isolations is here.
Questions:
- Why were there 3 buffers added to the bacteria before loading them onto the column?/ Couldn’t the 3 solutions have been mixed into one?
- What caused the plasmid DNA to fall off the column?
Week 3: OD readings and PCR
We will use the spectrophotometer (introduced in week 1 or 2) to measure the concentration and the purity of the DNA solution that we prepared the week before. We need to quantify the concentration because we’ll be working with specific amounts and concentrations of DNA in later experiments.
Detailed Procedure for Measuring DNA is here.
Questions:
- What were the OD readings of your 2 DNA plasmid preparations? Include both the absorbance at 280 and 260 readings. Make a table.
- What was the ratio of the 260/280 for your DNA? What does this tell you about the purity of your DNA samples?
We will then set up a polymerase chain reaction (PCR) as one way to test if we have isolated a plasmid that contains a DNA sequence of the correct size as our GOI. This is one of the two methods that we will use to ensure that we have DNA that contains the GOI that it should. You’d think that you could trust the instructors to give you DNA that doesn’t need testing, but in practice, we’ve experienced issues with DNA sent to us by companies and collaborators that wasn’t what it was supposed to be, so testing is always a good idea. Of course, the most definitive test would be to sequence the DNA (done at an outside facility), but that ‘typically’ isn’t necessary when starting out with a pure recombinant plasmid from a company that has done their own validation tests. We would, however, do this if we obtained really strange results that couldn’t be easily explained.
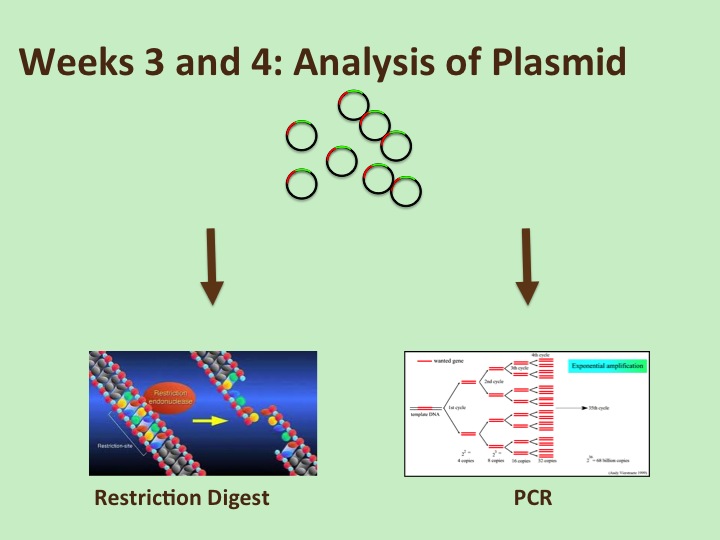
The PCR reaction requires mixing our DNA with DNA primers (short stretches of DNA that bind at the two ends of the DNA to be amplified), dNTP’s (the building blocks: A’s, T’s, C’s and G’s of DNA), as well as the appropriate buffer and the enzyme to carry out the reaction. Essentially, we are again amplifying our DNA, but only the stretch of the plasmid that contains our GOI. We will analyze our results on a gel next week.
Detailed Protocol for PCR is here.
Question:
- Why don’t we use PCR in the first week to amplify our plasmid?
Designing a restriction digest: During the downtime in lab or within a couple of days, your group should determine which restriction enzymes would be useful to cut your DNA into pieces that would tell you if the plasmid contains the GOI. See the separate sheet that explains how to do this (using a website tool). This will also be demo’d in class.
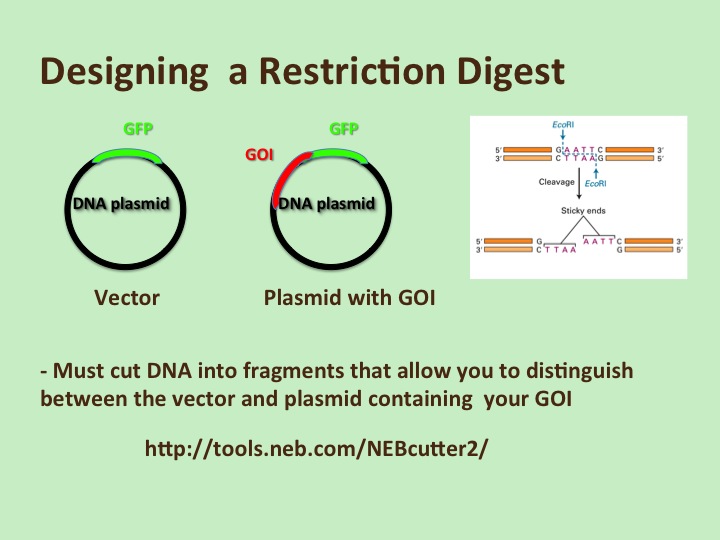
Detailed Protocol for designing a restriction digest is here.
Week 4: Restriction Digest and agarose gel electrophoresis
The restriction digest is our second analytical technique to confirm that our plasmid contains the GOI. We should see fragments of DNA of particular sizes when cut with the enzymes that we selected if our gene is present, and fragments of different sizes if our gene isn’t present. The restriction digest requires mixing our DNA to be tested, the restriction enzyme that we selected and the appropriate buffer in a small tube (some enzymes may need additional cofactors to work efficiently).
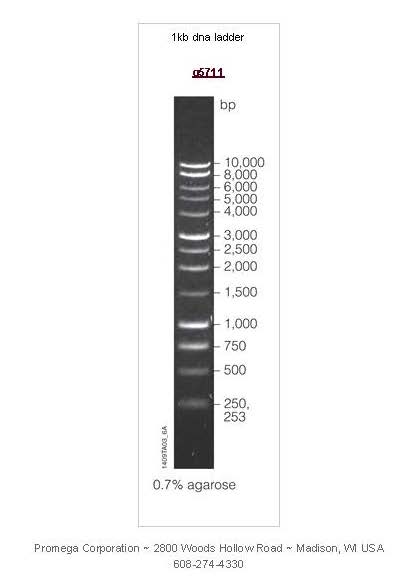
To analyze both the PCR and the restriction digest, we run our DNA samples on a gel. The gel is a porous matrix (agarose in this case) that separates DNA fragments according to their size: small molecules migrate through the gel matrix more quickly than larger DNA fragments . We also run “markers”, which are DNA fragments of known sizes on our gel to help us figure out what size the DNA fragments are (below).
Detailed Protocol for Restriction Digest and Agarose Gel Electrophoresis is here.
Questions:
- What are the controls for the restriction digest and PCR reactions?
- What are the expected sizes for your PCR and restriction digest samples?
Up to this point, all of the lab work we’ve done has been to prepare and test materials. In real life, researchers spend a considerable amount of time working out techniques, preparing reagents and testing equipment and reagents before and while conducting the more exciting data-generating experiments.
Week 5: Transfection

This week we carry out our first big experiment, which requires working in the tissue culture hood with live human cell cultures. We have to be very careful of our sterile techniques and conscious of everything that our sterile reagents touch, so we don’t end up contaminating our cells with bacteria (which are everywhere!). The procedure is fairly straightforward: we mix our reagent that facilitates transfection (taking up DNA by mammalian cells-similar to the transformation that we did the first week of the project) with the DNA that we want to transfect, then we drop this mixture onto the cells and return the cells to the incubator. The DNA that we want to transfect includes our GOI, of course, but also a reporter gene. This reporter helps us to determine if our GOI is causing a functional change in gene expression in the cells. We may also add in a second reporter gene that helps us to normalize our numbers, thus minimizing variation due to unequal numbers of cells in the samples or different transfection efficiencies between samples.
Because it can be difficult to detect changes in cells that are in a resting state, we will activate our cells with various drugs that we suspect may have an effect on the reporter and/or GOI. Sadie may make some recommendations of drugs to try or you can choose from those that are available. Instructors will add the drugs and then kill your cells by freezing them before the next lab period. It’s okay to kill the cells at this point because they have already produced the proteins that we want to analyze, and the cells have to be dead to perform the assays.

Detailed Protocol for Transfection is here.
Questions:
- Why don’t we use the DNA from our PCR reaction or restriction digest for our transfections?
- What are general similarities and differences between Transformation and Transfection?
- What are the controls for our transfection?
- What drugs will the Instructors be adding to your sample to activate your cells?
- What reporter did you use in your transfection?
- What is the normal function of your reporter gene in cells?
Week 6: Luciferase Assay
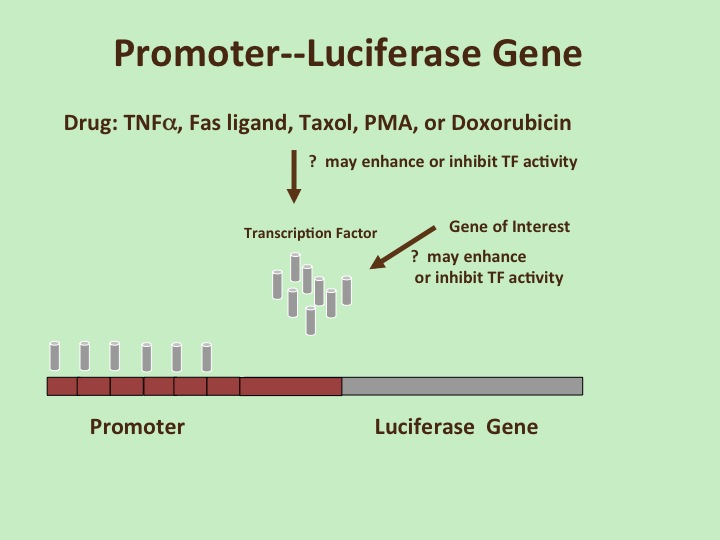
Now we get some fun results! Although this assay is relatively simple to perform, understanding what the results are actually showing requires some effort. The proteins from the dead cells can be released from the cells/membranes by adding lysis buffer that blows up the membranes of the cells. The solubilized cell mixture that contains all of the cells’ proteins is called the lysate. The activity of the reporter that we put in during the transfection can be measured by adding a substrate to the cell lysates. Light will be emitted, but it’s too weak to detect with our eyes, so we use a luminometer. You’ll get a print out of numbers of luciferase activity in your various samples.
There are several variables in this experiment, and different ways to interpret and display results. The basic question addressed is “does your GOI affect the expression of the reporter gene in the cells that you’ve chosen?” You would need to compare the samples with and without your GOI (i.e. vector vs. GOI) to answer this question. A second question is “does the drug affect the reporter?” Again, comparing samples with and without drugs will give an answer. A third question is “do the GOI and drug together have a synergistic/additive/antagonistic effect?” All 3 of these results are valid findings. You should do a literature search to make sure that you know something about your GOI, something about the cells you’re working with, something about the drug and something about the reporter gene to see if your results are consistent with past reports, or if any findings are truly novel.
Detailed Protocol for Luciferase Assay is here.
Questions:
- Did your GOI have an effect on the reporter?
- Did your drug(s) have an effect on the reporter?
- Did your GOI and drugs antagonize/synergize or have an additive effect on the reporter?
- Do you have good duplicates?
- What variable(s) would you like to change for your next set of experiments? Why?
You will have the opportunity to either repeat this exact experiment or change a variable or two (different cells, different reporter, borrow someone else’s GOI) to get some additional results. A new protocol will not be provided for the second set of experiments; you should take detailed notes and refer to the initial transfection and luciferase protocols to conduct the later experiments.
Results from both luciferase assays should be recorded in the class Google doc. This share information will allow you to see the results of other groups who may have used similar reagents.
Week 7: Polyacrylamide Gel electrophoresis (of proteins)
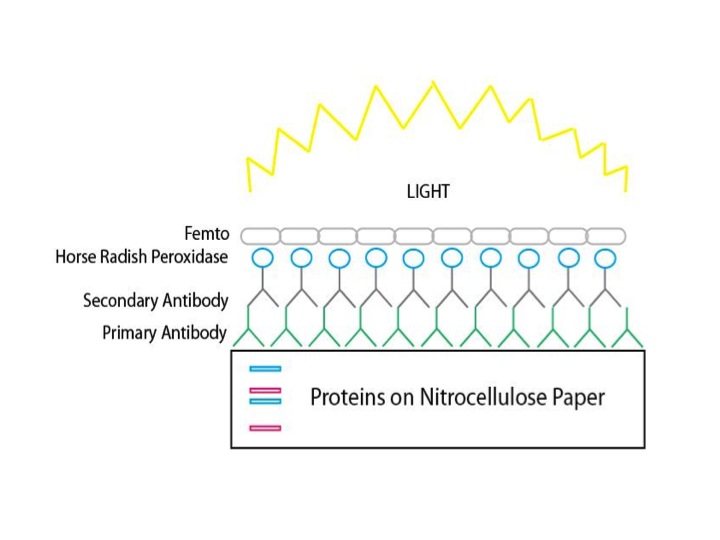
Just because we put some DNA on the cells and added the transfection reagent, there’s no guarantee that our transfections were successful. We need some evidence that that the cells actually took up the DNA, transcribed it into RNA and translated it into protein. We need a way to detect the expression of the protein we expect our DNA to encode. There are a few ways to do this. Since our protein is fused to a GFP protein, we can look under a fluorescent microscope and see if/where in the cells our proteins are expressed by looking for green fluorescence. It takes a pretty good microscope to be able to detect proteins that are in subcellular structures, but we sometimes have luck with this. Alternatively, we can perform a western blot (immunoblot) to detect expression of our proteins (see image below). We’ll run all of the proteins from the transfected cells on a gel, separating them by size by applying a current and eventually probe with a specific antibody (not to be confused with antibiotic!) for our protein. This is a different type of gel than the one used to analyze DNA. It is made of acrylamide rather than agarose and runs in a vertical, rather than horizontal, direction. Protein markers are used to help determine the size of your proteins. After the gel has finished running, you will need to transfer the proteins to a membrane (blot) that is easier to manipulate (won’t break into pieces) than the gel because we will be treating the membrane with antibody solutions next week. Once the proteins have transferred onto the membrane, we’ll add blocking solution. The blocking solution has a bunch of proteins in it (usually non-fat dry milk protein), which will “block” any sticky proteins from binding inappropriately on the membrane. This will increase our signal (antibody bound to specific protein) to noise (antibodies randomly sticking to proteins) ratio.
The proteins from our cells are run on a gel to separate them by size. They are then transferred to a membrane that can be probed with reagents that detect our specific protein. In this case, we use an antibody against GFP (primary antibody), which will bind to our protein. Then we add an antibody that binds to the GFP antibody (secondary antibody) that is also linked to an enzyme (Horse Radish Peroxidase) that can give off light when exposed to a substrate (femto) that contains ATP.
Detailed Protocol for Acrylamide Gel Electrophoresis (SDS-PAGE) is here.
Questions:
- How can you tell if you had a successful transfer of proteins from the gel to the membrane blot?
- Unlike DNA, in which all nucleotides have the same charge, amino acids/protein have different charges. How do we ensure that we are separating our proteins according to their size and not by their charge?
Week 8: immunoblot assay and design of next experiment
We’ll stop by the lab at the beginning of class time to add our primary antibody to the blot. The primary antibody has a very specific binding site for the protein that we want to detect (in this case green fluorescent protein. We could have used a primary antibody specific for your GOI, but then we would need to have a different antibody solution for each group.) We’ll wash away the excess antibody solution, then add a secondary antibody, which binds to the first one. This secondary has an enzyme attached to it that will emit a signal once the substrate is added. Once again, we cannot see the signal, but we have a machine (biochemiluminescence machine) that can. You should be able to see proteins of the expected size on the blot, which indicates that the mammalian cells did indeed take up the DNA containing your GOI.
Detailed Protocol for Immunoblotting(western blot) is here.
Questions:
- What was the expected size of your proteins (both GFP protein in the vector and the GOI-GFP fusion protein)?
- Did you get the results you expected?
- If not, what are some possible explanations?
- If you did not see a GFP-GOI protein of the expected size, how would this affect your interpretation of the luciferase results you got 2 weeks ago?
- Why do we add the antibodies in two steps? Couldn’t we just use a primary antibody with enzyme attached to it and save some time?
Meta-questions
- Describe some ways in which the lab activities complemented or reinforced material learned in lectures, reading and other classroom activities.
- Describe some insights and skills that you developed while engaging in the lab-related activities (working in the lab, keeping the lab notebook and writing editing the lab report) beyond learning how to do some specific techniques.
Vocabulary
Aliquot
To separate into smaller portions
. One of the portions created by dividing a larger sample into equal parts
Antibody (Ab)
A protein that is produced naturally to help fight infection, but can also be generated in the lab to recognize and bind to specific proteins
Aspirator
A suction pump used to create a partial vacuum
Assay
Qualitative or quantitative analysis of a substance or an activity (an ‘enzymatic assay’, a ‘binding assay’, etc.)
Buffer
A substance that minimizes change in the pH of a solution when an acid or base is added to the solution.
Destination vector/plasmid/clone
The plasmid into which your ‘gene of interest’ is subcloned. Characteristics of your particular Destination vector will depend on your ultimate experimental goals.
DMEM
Dulbecco’s Modified Eagle Medium
This media contains essential nutrients (amino acids, vitamins, sugars, etc.) for the growth of COS cells and many other cell lines.
DMSO
Dimethyl sulfoxide.
A chemical that affects the integrity of mammalian membranes. It is used to make mammalian cells accepting of extracellular DNA and to preserve the membranes of cells during freezing.
ECL
Enhanced chemiluminescence.
A procedure to detect the expression of specific proteins that have been trans- blotted to a membrane from a gel. The ECL system involves an enyme (typically horse radish peroxidase attached to secondary antibody), substrate (luminol) and H2O2 buffer, which together emit localized light captured by a CCD camera (or on film).
Eppendorf/microcentrifuge tube
A small plastic tube often used to mix experiments that holds up to 1.5 ml
FCS/FBS (Fetal Calf Serum/Fetal Bovine Serum)
A growth factor- and protein- rich supplement, often added to media (DMEM or RPMI) to supplement/augment the growth of cells in culture.
GFP
Green fluorescent protein
A gene or its corresponding protein that fluoresces green under UV (or blue) light
GOI (gene of interest)
Any gene that encodes a protein that is a target of research.
HRP
Horse radish peroxidase
An enzyme that catalyzes the reaction of hydrogen peroxide (H2O2) to H2O in the presence of electron donors and carriers. In immunoblot studies, this enzyme is often bound to an antibody that recognizes a specific protein and aids in the visual detection of that protein.
LB/AMP
Luria Broth with ampicillin, a special growth media for bacteria that contains antibiotic for selection of bacteria that contain a recombinant plasmid.
‘Passing’ cells
Using trypsin to enzymatically digest cell:cell and cell:matrix contacts, allowing confluent adherent cells to become suspended and easily diluted into new flasks.
PBS
Phosphate-buffered saline solution
. This pH and salt-balanced solution is used to wash mammalian cells because using water would lyse them!
PCR
Polymerase chain reaction.
A technique used to amplify a specific region of DNA for cloning or analysis.
Pen-Strep
Penicillin-streptomycin.
An antibiotic solution that is added to mammalian cell growth media to help prevent the growth of bacteria
Pipette/Pipet/Pipettor/micropipet
Used to measure and transfer liquids. Disposable plastic pipets can accurately measure between 1 -25 ml., and are used in conjunction with a Pipettor, which runs on batteries or electricity. Micropipets are handheld devices for measuring between 0.2-1 ml of liquid. They are used in conjunction with disposable plastic pipet tips.
Plasmid
Circular DNA found in bacteria that can carry immunity to certain antibiotics; useful as highly engineered ‘carrier’ vectors for cloning purposes
.
Protocol
Step by step description of a lab procedure.
Recombinant DNA Technology
Manipulation and combination of DNA molecules from different sources.
Restriction enzymes/restriction endonucleases
Proteins isolated from bacteria that catalyze the cleavage of double stranded DNA at specific recognition sequences.
SDS-PAGE
Sodium dodecyl sulfate polyacrylamide gel electrophoresis
A technique primarily used for the separation of proteins by their intrinsic molecular weights.
Spectrophotometer
A machine that measure the amount of light of a specific wavelength that passes through a medium. This can be used to quantitate DNA, RNA or proteins dissolved in a solution.
Supernatant/’supe’
The clear fluid above a sediment or precipitate (typically after centrifugation). The sediment may be a pellet of cells or DNA or something else that was floating in the liquid before centrifugation.
Transformation
The uptake of DNA from the external environment by bacteria.
Transfection
Introduction and uptake of recombinant plasmid DNA into a host cell (eg. Cultured mammalian or yeast cells). This may be accomplished by chemical (eg, cationic lipids/reagents) or electrical (electroporation) means
Vortex
Mix a solution/suspension with the use of a vortexer (see picture)
